We’ve all felt that mini heart-attack. That email notification at 3 AM: “Did you just try to log in from [India]?”
Your heart drops. You dash to change your password, racking your brain to remember what other accounts used that same password you’ve been recycling since 2010.
Here’s the hard truth: In today’s world, a password alone is not enough. They can be guessed, phished, or leaked in a data breach. Think of your password as a simple lock on your front door. A determined thief can pick it. What you need is a deadbolt.
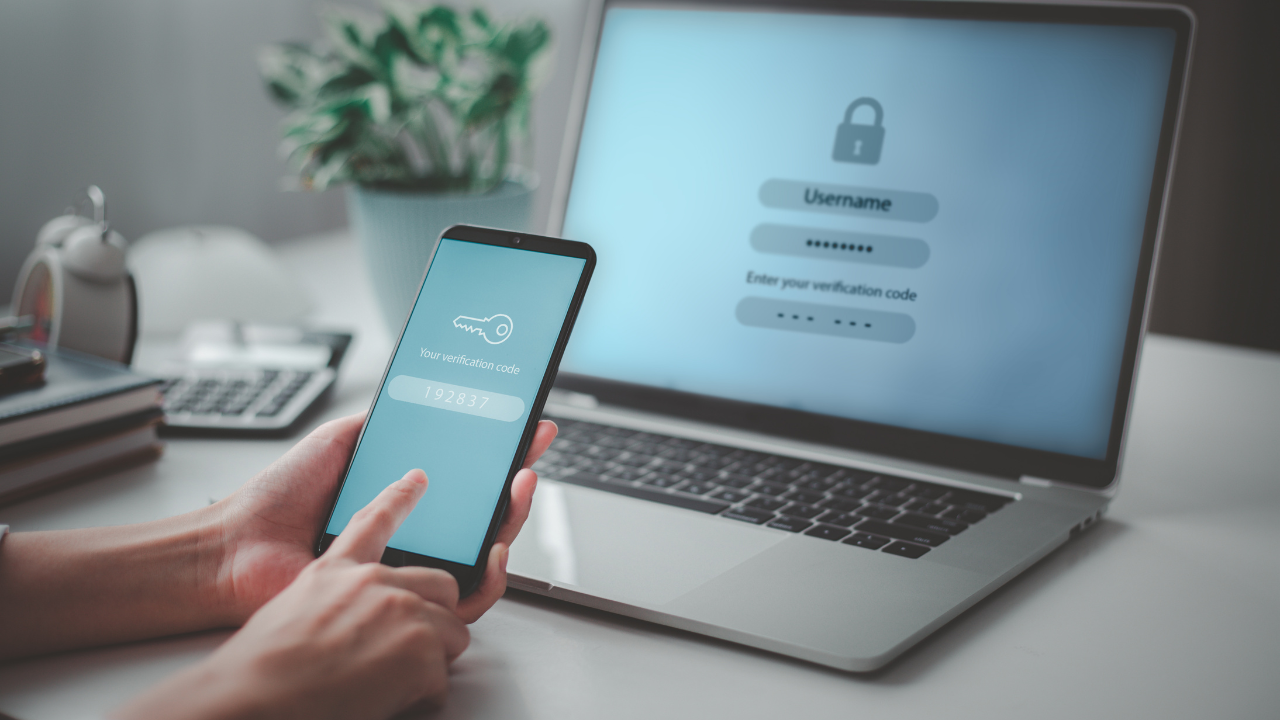
That deadbolt is Two-Factor Authentication (2FA).
Setting it up sounds technical and annoying, but I promise you, it’s one of the single most effective things you can do to protect your digital life. This is your complete two-step verification guide. We’re going to walk through how to enable 2FA on all your important devices and accounts, step by step.
What Exactly is Two-Factor Authentication?
Let’s demystify this. 2FA is just a security process that requires two different ways to prove you are who you say you are.
It’s based on combining two of these three things:
- Something you know: Your password.
- Something you have: Your phone, a USB security key, or a smart card.
- Something you are: A fingerprint, face scan, or retina scan (biometrics).
When you log in with 2FA, you first enter your password. Then, the service asks for a second code, which is usually sent to your phone.
Think of it like your bank card. To get cash from an ATM, you need your card and your PIN. 2FA applies that same logic to your online accounts.
Even if a hacker steals your password, they can’t log in. Why? Because they don’t have your phone.
Why You Absolutely Need to Set Up 2FA (Like, Yesterday)
“But I don’t have anything important to steal,” you might think. You’d be surprised.
- Your Email is the Master Key: If someone gets into your primary email (like Gmail or Outlook), they can reset the password for every other account you own—your bank, your social media, your shopping sites.
- Identity and Financial Theft: Hackers can use your social media to impersonate you and scam your friends and family. They can get into your Amazon account and order things with your saved credit card.
- Data Breaches Happen Daily: You can have the world’s most complex password, but it’s useless if the company you have an account with gets breached and leaks it. 2FA is your personal insurance policy against their mistakes.
Enabling two-factor authentication isn’t just for tech gurus. It’s for everyone. It’s the digital equivalent of locking your car or house. It takes a few seconds and provides massive peace of mind.
Choosing Your 2FA Method: SMS vs. Apps vs. Keys
Before we start the setup, you need to know the three main types of 2FA. When you go to enable two-factor authentication, you’ll often be given a choice.
1. SMS (Text Messages)
This is the one you’ve probably seen the most. The service just texts a six-digit code to your phone. You type it in. Simple.
- Pro: It’s incredibly easy. You don’t need to download any new apps, and literally everyone with a mobile phone can do it. It’s familiar and takes zero effort.
- Con: Hackers have a sneaky trick called “SIM-swapping” where they can convince your phone company to “steal” your phone number, letting them get your codes. It’s rare, but it’s a known weak spot.
2. Authenticator Apps (The Gold Standard)
These are special apps on your phone (such as Google Authenticator, Microsoft Authenticator, or Authy) that perform one specific task: they generate a new, 6-digit code every 30 seconds.
- Pro: A hacker can’t intercept what isn’t being sent! To get this code, they’d have to physically steal your phone and unlock it.
- Con: Honestly, the “con” is tiny. You have to spend about 60 seconds one time to download an app and scan a QR code to link it to your account. That’s it. It’s a one-time setup for a lifetime of better security.
3. Hardware Keys (The Bank Vault)
This is the ultimate in personal security. It’s a small, physical device (like a YubiKey or Google Titan Key) that looks like a tiny USB drive. You plug it into your computer or tap it on your phone to prove it’s you.
- Pro: This is basically un-hackable from a distance. You can’t be “phished” for a physical object you’re holding in your hand. A hacker in another country can’t “guess” your key. It’s the digital equivalent of needing a physical key to open a bank vault.
- Con: It’s not for everyone. First, they cost money (usually $20-$50). Second, you have to actually carry it with you. If you’re trying to log in and your key is at home on your other keychain, you’re out of luck.
My Suggestion is to use the authenticator app – it’s secure but still easy to handle. Grab either Authy or Google Authenticator from the app store today; they work well without hassle.
The Main Event: Your Two-Factor Authentication Setup Guide
Let’s lock down your most important accounts. The process is similar for all of them: log in, go to Security Settings, find “Two-Factor Authentication,” and turn it on.
1. How to Enable 2FA on Your Google Account (Gmail, YouTube, Android)
This is your most important one. Let’s do it first.
- Go to myaccount.google.com.
- On the left side, click on the “Security”.
- Look for “Signing in to Google,” and select “2-Step Verification.”
- Click on “Get Started” and re-enter your password.
- It will likely default to using your phone for prompts or SMS. This is good, but let’s add our authenticator app for better security.
- Look for the “Authenticator app” option and click “Set up.”
- It will show a QR code on your screen. Open your authenticator app on your phone, tap the “+” button, and scan the code.
- Enter the 6-digit code from your app to verify it.
CRITICAL STEP: Google will offer you “Backup codes”. Print these out! If you ever lose your phone, these codes are the only way to get back into your account. Store them in a safe place.
2. How to Enable 2FA on Your Apple ID (iPhone, Mac, iCloud)
Apple’s 2FA is tightly integrated into its devices, making it very easy.
- On your iPhone or iPad:
- Go to Settings → [Your Name].
- Click “Password & Security”.
- Tap Turn On Two-Factor Authentication and follow the on-screen prompts.
- On your Mac:
- Go to the Apple menu, → System Settings.
- Click [Your Name] at the top of the sidebar.
- Select “Password & Security” and turn on 2FA.
Now, when you sign in on a new device, a 6-digit code will automatically pop up on your other trusted Apple devices (like your iPhone or Mac).
3. How to Set Up 2FA on Your Microsoft Account (Windows, Outlook, Xbox)
- Go to account.microsoft.com and sign in.
- Click “Security” tab.
- Click on “Advanced security options”.
- Under “Additional security,” you’ll see “Two-step verification.” Click “Turn on”.
- Follow the wizard. It will ask you to verify your identity.
- I highly recommend using the Microsoft Authenticator app. It sends a simple “Approve” or “Deny” push notification to your phone, which is even easier than typing a code.
4. How to Enable 2FA on Social Media (Facebook, Instagram, X)
Your social accounts are prime targets for hackers. Let’s secure them.
- Facebook & Instagram (Meta Account Center):
- Click “Accounts Center”.
- Go to “Password and security”.
- Click “Two-factor authentication” and select the account you want to secure.
- Choose your method (again, “Authenticator app” is recommended) and follow the prompts.
- X (formerly Twitter):
- Go to Settings and privacy → Security and account access.
- Click “Security”.
- Click “Two-factor authentication”.
- Choose your method. (Note: X may charge for the SMS method, so the “Authenticator app” option is free and more secure).
You need to do this for Amazon, then PayPal, and include TikTok as well. Additionally, don’t forget to use a password manager app (such as 1Password, LastPass, or Dashlane). Lock down that password tool with two-factor auth, no matter what; it’s basically the key to everything.
Your 2FA Checklist and Best Practices
You did it! You’ve just built a digital fortress. Here are a few final pro tips for managing your 2FA on devices.
- SAVE YOUR RECOVERY CODES. I’m saying it again because it’s that important. If you lose your phone, these codes are your lifeline. Print them and put them in a safe, or store them in a secure (and separate) password manager.
- Always Prefer Apps Over SMS. As we discussed, authenticator apps are just more secure and resistant to SIM-swapping attacks.
- Use “Approve” Prompts. If an app (like Microsoft or Google) offers a push notification (“Was this you? Yes/No”) instead of a code, use it. It’s faster and just as secure.
- Beware of Phishing. 2FA is amazing, but it can’t protect you if you’re tricked. No legitimate company will ever call or email you asking for your 2FA code. Never, ever give that code to anyone.
You wouldn’t walk out leaving your front door wide open – so why do it online? Spending around 10-15 minutes right now to turn on two-step verification might just be the smartest move for keeping yourself safe, plus saving future stress. And if you want then you can do check about cyber security tips too.


Leave a Reply